

Subtractive vs Additive Manufacturing
The key difference between 3D printing and CNC machining is that 3D printing is a form of additive manufacturing, whilst CNC machining is subtractive. This means CNC machining starts with a block of material (called a blank), and cuts away material to create the finished part. To do this, cutters and spinning tools are used to shape the piece. Some advantages of CNC machining include great dimensional accuracy as well as many compatible materials, including wood, metals and, plastics.

The Generic AM Process;
Step 1: CAD
Step 2: Conversion to STL (Standard Tesselation Language)
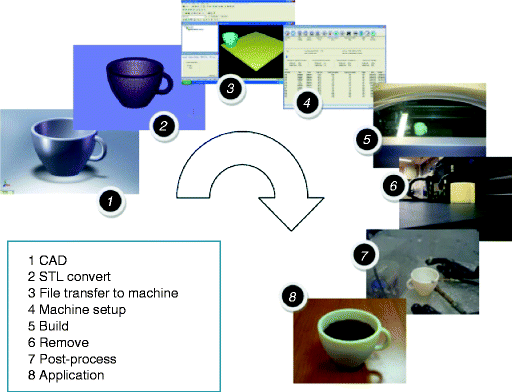
Step 3: Transfer to AM Machine and STL File Manipulation
Step 4: Machine Setup
Step 5: Build
Step 6: Removal
Step 7: Post-processing
Step 8: Application
AM Classification
- Vat photopolymerization: processes that utilize a liquid photopolymer that is contained in a vat and processed by selectively delivering energy to cure specific regions of a partial cross-section.
- Powder bed fusion: processes that utilize a container filled with powder that is processed selectively using an energy source, most commonly a scanning laser or an electron beam.
- Material extrusion: processes that deposit a material by extruding it through a nozzle, typically while scanning the nozzle in a pattern that produces a part cross-section.
- Material jetting: ink-jet printing processes.
- Binder jetting: processes where a binder is printed into a powder bed in order to form part cross-sections.
- Sheet lamination: processes that deposit a layer of material at a time, where the material is in sheet form.
- Directed energy deposition: processes that simultaneously deposit a material (usually powder or wire) and provide energy to process that material through a single deposition device.
Benefits of 3D Printing-
1.) Ease of Use
3D printing is known to be simpler to use than CNC machining. This is because once the file is prepared, you just need to choose the part orientation, fill, and support if needed. Then once printing has commenced, no supervisor is required and the printer can be left until the part is finished. Post-processing requirements depend on technology.
However, CNC machining is a far more labor-intensive process. A skilled operator is required to choose between different tools, rotation speeds of tools, the cutting path, and any repositioning of the material the part is being created from. There are also post-processing techniques that can require more time.
2.) Accuracy, Size limitations & Geometric Complexity
Though there are a number of 3D printing technologies, we have chosen to compare CNC machining with SLS, industrial (not desktop) FDM, and DMLS metal 3D printing. In terms of tolerance, CNC machining is superior to all 3D printing processes, even DMLS. However, with minimum layer thicknesses, the superiority is not so profound and is not as precise as DMLS.
Powder bed fusion 3D printing processes such as SLS and DMLS are limited in their build volume, however. Even technologies with larger build volumes such as FDM cannot compete with CNC in terms of the maximum size of parts.
3D printing is well-known for its advantages in creating parts with high geometric complexity. Though supports are required for some technologies, 3D printing can create parts with geometries that no traditional manufacturing method can replicate. Technologies such as SLS and Multi Jet Fusion by HP can even do this without any support structures.
3.) Cost
Though on average 3D printing is cheaper, costs depend on how many parts are required and how quickly you need them. For larger quantities (higher double digits to 100s) CNC is likely to be more appropriate. For low volumes, 3D printing is more appropriate and lower-cost. 3D printing is also more appropriate if you need your prototypes or parts very quickly. There are additional factors however that make comparing the two technologies more difficult. These include materials varying in cost (from cheap materials like ABS to materials that can cost $500/kg like PEEK), and repairing and changing machinery (such as CNC heads).
4.) Environmentally Friendly
Since CNC involves cutting material away from an original block, there is always going to be a mess afterward. These pieces of material need to be cleaned afterward and disposed of, which isn’t required from 3D printing. Since additive manufacturing forms an object on the build platform from material fed into the machine, there is no mess except supports (if used). This makes 3D printing the more ethical of two methods as there is a less unused waste.
5.) Materials
In 3D printing, commonly used thermoplastics include ABS, PLA, Nylon, ULTEM, but also photo-polymers such as wax, calcinable or biocompatible resins. Some niche 3D printers also allow for the printing of parts in the sand, ceramics, and even living materials. The most common metals used in 3D printing include aluminum, stainless steel, titanium, and Inconel. It is also worth noting that to 3D print metal, expensive ($100,000+) industrial machines are required. Some materials such as superalloys or TPU (flexible material) cannot be created with CNC, so must be used with 3D printing or rapid tooling technology.


